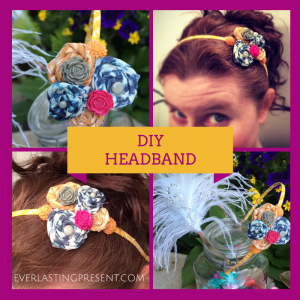
This year, instead of adorning your kid’s – or your own – head with an Easter bonnet why not try making a cute headband. Don’t know how? Well, then you’ve stumbled upon the right article.
You see, headbands are my thing. I was once really into hats – and I suppose I still am – but headbands are my new “go-to” accessory. When I saw that Close To My Heart had released a Base & Bling Headband awhile back, I couldn’t wait to get my hands on one. Then it hit – the creativity block. You know what I am talking about. You have the perfect project starter and just aren’t sure what to create. So I let these bad boys hang around my studio FOREVER. Then one Friday night I felt inspired and thought – why don’t I do a bunch of the fabric flowers with some of the acrylic flowers mixed in? That was it! Moments later, I broke out my glue gun and it was on.
To create one of these headbands you’ll need about 45-minutes and some super simple supplies, including the following:
- Base & Bling Headband
- 2 pieces of contrasting fabric – 3″ wide by about 10″ long (you can decide how big you want to make your fabric flowers but this is a good place to start)
- Glue Gun (or the adhesive backing, sold here)
- Acrylic Flowers (like Base & Bling Jewels)
- Washi tape for the metal headband (I used Close to My Heart’s Honey Triangles)
Here are the steps for assembling your headband:
- You’ll need to cover your headband with the Washi tape. Just wrap it around until the entire band is covered (I used two little pieces to cover the ends before I went up the sides).
- Next, you should create your fabric flowers. You can watch a quick video that shows how mine were created by clicking here.
- Once you have your flowers, you can simply hot glue them to your base. Be careful not to burn your fingers, like I did (the hot glue heats up the metal and it’s not fun crafting with blisters on your fingers).
- Now, add on your embellishments to the tops of the flowers (I added one flower on the actual headband part on the top and bottom of the circle base)
The first one was very easy. Oh and get this, I tried to make the second one even easier – impossible, right? NOT! It was so simple and only took me 10-minutes to create.

I’ve already placed my order for some more headbands. They are a little more fragile, but I figure if it doesn’t work out I can just start over.
Want to get your headband supplies now? Stop by my store or click the links above in the supplies list.
My name is Megan, people also call me MC, and I’m a wiz at crafty projects and have some really great DIY ideas that are easy to do. Check out my page at http://everlastingpresent.com/.


